Saturday, April 28, 2012

First Inspection

My first hive inspection was this morning. Since Monday, I had peeked into the top feeder most of the days since installing the bees on Monday. Tuesday was still pretty cold, 50° or so, and the bees had filled up the top feeder and were chowing down. Wednesday hit 55–60°, maybe even warmer, and I noticed bees in the dandelions around the yard and the feeder was completely empty of bees, presumably they were all out getting “real” food.

On to the first inspection. The hive looked fine so opened it up and moved the frames from the queen cage area.

The First Inspection
Rearranging the frames.


First thing is to check out the queen cage. Looks like she got out OK. Also looks like I should have checked in on the queen after just a few days instead of waiting a full five, check out the two big chunks of “extra” comb, those really shouldn’t be there and with them there I can’t put the 10th frame in.

The First Inspection
The queen cage exposed. Notice the extra comb
The First Inspection
A lot of bees on the cage
The First Inspection
No queen here. Yay!
Queen appears to be free, presumably laying eggs in the box, and all is good!

The First Inspection
Really don’t want that comb to be there.
This is what I’m talkin’ about:

The First Inspection
Awesome!

So far; so good. Now I need to go ask in one of the bee forums on how best to deal with the chunks of comb between those two frames.

So far no bears, or if there were they didn’t mess with the hive. Gotta get that electric fence installed!

Tuesday, April 24, 2012

Installing the Bees

In my 
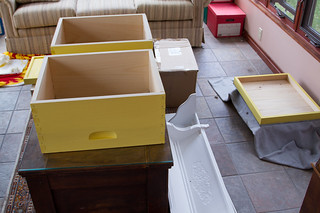
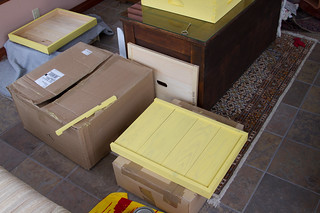
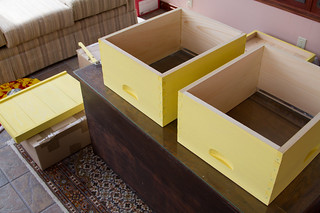
last post I described the hive setup and what I brought out to the “field” to install the bees.

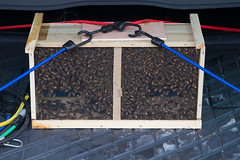
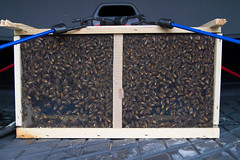
It was an overcast afternoon in the mid-50s and a huge rainstorm that came up the east coast the day before was still causing sporadic showers, but fortunately nothing very heavy. So with the hive ready for the bees, I gathered up all the stuff described in my last post and took it out to the hive. Then went to the garage and grabbed the package and brought the bees out to the hive.

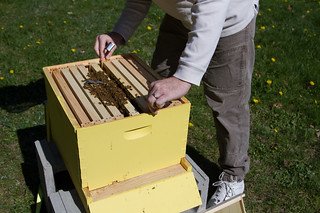
First thing, they are loud. Gave them a few sprays of sugar water and they quieted down some. Opened the hive, took out one frame and put in my plastic box I brought out with me, and took out four more frames and set them aside. Donned my veil, took a deep breath, and pried the cover off the package with the hive tool. Under the board is the feeding can. OK, yank that sucker out. A metal tab, which turned out to be holding the queen cage, fell right into the giant pile of bees. Pretty impressed with the buzzing mass of bees I was not about to reach down in there to retrieve whatever it was that fell.

Walked back to the house and got a can opener. Back at the hive I took the top off the can and it looks like that just contained sugar water to feed the bees. That makes sense. So where’s the queen? In the giant pile of bees, of course. Just do it you baby: reach down in there and get it. Good, the metal tab is sticking up. Got it. Ah!, there’s the cage I was expecting to find. I’m actually brushing bees off of this thing, and I’m not wearing gloves. My only attire is the veil (what the heck is this 40′ long cord for, anyway?), a white long-sleeve shirt, sneakers, and dungarees with strings tied around the ankles. But to these novice eyes, the queen looks perfectly healthy. There’s the little white paint on her back and she sure is scurrying around that little cage.

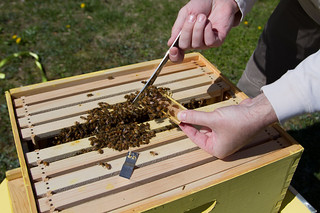
Focus. They seem louder, so I give them a little more spray. Gotta get that queen cage ready. Take out the pocket knife and start to take the cork stopper out of one end. Wait, where’s the candy that’s supposed to be under it? The queen’s going to walk out right now! Damn, there’s a cork on the other end too. I do my best to put the first cork back in the little hole, while watching bees out of the corner of my eye, wondering a little what the heck am I doing? Brush some bees off the cage and start digging the cork out of the other end. Good, the candy is under this one. Now, Ed Weiss, in his video, is all confidently and calmly standing there and at this point takes a small awl to put a hole in the candy for the bees to smell the queen’s pheromones. Even though I bought an awl just for this purpose I decided not to push my luck and didn’t touch the candy. I’ve been messing with this cage long enough.

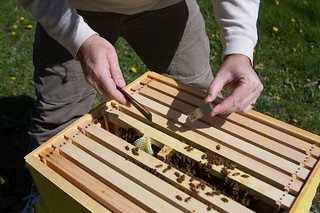
I was able to get the metal tab reattached to the queen cage and then placed it between the 5th and 6th frames, then snuggle the 6th frame right up next to it, all the while thinking “I’m playing with bees, man!” The two hive nails that I bent at a 45° angle to hang the cage from wouldn’t push into the wood which is why I stuck with the metal tab; it seemed like I was taking hours for this simple operation.

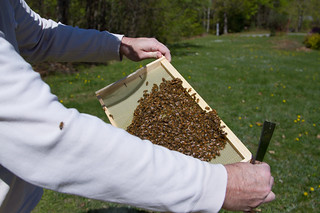
Here we go: take the package and shake those babies right into the hive box. Don’t forget to pour some over the queen cage so they find that. Shake a little, pour some more, shake some more, pour, … this is truly a bizarre thing to be doing. I get as many bees into the hive as I can then set the package on the ground. So old Ed says now reach in and spread those babies around a little bit so that the other three frames can be put in on top of them.

Now I’m just standing there at this point, in utter amazement at what’s in front of me. This must be the part where I get stung. In I reach and push the pile to one side. That was incredible. They are all buzzing like crazy, there’s a strong strong smell of, well, bee, and the heat! The air temperature is in the mid-50s. You can feel the bee furnace—apparently the clump is always at like 80° or so—enclose your hand. This is too awesome, I’ve gotta do that again. Down goes the hand and spread the clump to the other side. Not one sting! I don’t want to press my luck so I pick up the other three frames and put them on top of the bees. I don’t think any are getting smushed.

Truly a memorable event. I will be doing this again, for sure.

Hiving the Bees
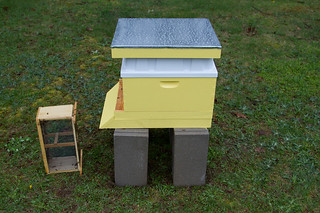
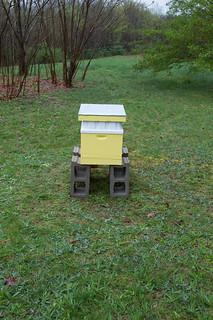
The bees are home. The feeder is on top of the super and is full.
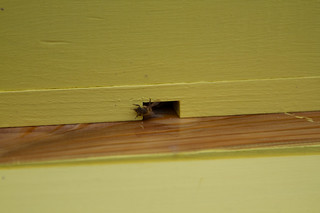
Hiving the Bees
Who goes there?

After putting the 3 remaining frames into the super (I’m holding out the 10th until I remove the queen cage), I put the feeding box on top of the super and poured in the 5 pints of sugar water. Place the top cover and done!

Around 6:00 pm I went out and put the lashing strap around the hive and tightened it. Hopefully that will protect them some from any bear or dog attacks. Though if a bear knocks the hive over seems like the 5 pints will drown a lot of the bees. Oh well, we’ll see.

Monday, April 23, 2012

Preparing the Hive

While having my morning pot of coffee, I watched (again) Ed Weiss’ excellent DVD An Introduction to Beekeeping: A Step-by-step Guide which very clearly shows how he installs a package of honey bees.

Before driving down to Tyngsborough this morning to get the bees, I dissolved 5 pounds of granulated sugar in a little over 5 pints of very hot water. Ended up using 2½ liters (the bucket is marked in liters) of water since 5 pints is about 2.4 liters and I wanted a little extra for the spray bottle of the sugar water. Let that sit to cool down to room temperature and hit the road.

Picked up the package of bees out of a panel truck. The guy had already handed out about half the load and I figure there were at least 50 packages left. So I strapped the girls into the back of the wagon and headed home. Fortunately, the trip was uneventful and got home pretty quick.

Preparing the Hive
This worked perfectly.
Preparing the Hive
Preparing the Hive


Once home, I put the package on the floor of the garage and poured some of the sugar water into a spray bottle, and gave the package a few squirts on both sides so they would have something to munch on. Left the package there for the next couple of hours to let them calm down and to get their hive put out.

I went out back and installed the hive. Took the 4 cinder blocks, found a good location facing southeast (for the hive entrance), stood the blocks up on their long ends, and leveled them as best I could without too much digging. I’ve decided to go with cinder blocks for now because I’m not sure the hive will stay where I placed it, and I don’t have the material for the bear fence yet so am going to use the lashing strap to go around the whole hive to keep everything together in case of a bear attack. Rumor has it the bear may knock the hive down but shouldn’t be able to open it. In any event, I’m going to order the bear fence over the next couple of days.

Placed the stand board on the blocks, then the bottom board, then one full-size super, the feeder, then the top board. That will be the initial configuration. Placed the entrance reducer so I don’t forget to do that later.
Tip: Do not paint the entrance reducer, it will no longer fit in the entrance space. It’s going to require some sanding, and I’ll probably order the metal mouse guard I was going to get from the get-go. Need to do some more reading first.
Preparing the Hive
The back of the hive faces northwest, so you are looking southeast here.


My next post will describe installing the bees into the hive!

Materials:
  • 4 cinder blocks.
  • 1 hive stand board.
  • 1 bottom board.
  • 1 entrance reducer.
  • 1 full-size super.
  • 10 frames with wax foundation.
  • 1 top board.
  • 1 feeder.
  • 2 bent hive nails.
  • 1 lashing strap with ratchet.
Food:
  • 5 lbs. Best Yet granulated sugar.
  • I decided not to try any medication this first time.
Equipment:
  • 1 bottle of isopropyl alcohol.
Tools:
  • Hive tool.
  • Pocket knife.
  • Awl.
  • Lashing strap.
Next Time:
  • Pliers.

Saturday, April 21, 2012

Preparing the Woodenware

The first coat of paint has been put on the woodenware. Getting ready to pick up 3# of bees and their Italian queen from New England Beekeeping Supplies on Monday.

A Home for the Girls
Two full-sized supers: a brood box and a honey box.


A Home for the Girls
Entrance reducer and bottom board.


A Home for the Girls
Buzz buzz!