Before driving down to Tyngsborough this morning to get the bees, I dissolved 5 pounds of granulated sugar in a little over 5 pints of very hot water. Ended up using 2½ liters (the bucket is marked in liters) of water since 5 pints is about 2.4 liters and I wanted a little extra for the spray bottle of the sugar water. Let that sit to cool down to room temperature and hit the road.
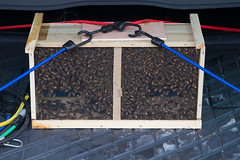
Picked up the package of bees out of a panel truck. The guy had already handed out about half the load and I figure there were at least 50 packages left. So I strapped the girls into the back of the wagon and headed home. Fortunately, the trip was uneventful and got home pretty quick.
 |
| This worked perfectly. |
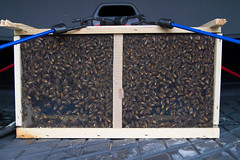
Once home, I put the package on the floor of the garage and poured some of the sugar water into a spray bottle, and gave the package a few squirts on both sides so they would have something to munch on. Left the package there for the next couple of hours to let them calm down and to get their hive put out.
I went out back and installed the hive. Took the 4 cinder blocks, found a good location facing southeast (for the hive entrance), stood the blocks up on their long ends, and leveled them as best I could without too much digging. I’ve decided to go with cinder blocks for now because I’m not sure the hive will stay where I placed it, and I don’t have the material for the bear fence yet so am going to use the lashing strap to go around the whole hive to keep everything together in case of a bear attack. Rumor has it the bear may knock the hive down but shouldn’t be able to open it. In any event, I’m going to order the bear fence over the next couple of days.
Placed the stand board on the blocks, then the bottom board, then one full-size super, the feeder, then the top board. That will be the initial configuration. Placed the entrance reducer so I don’t forget to do that later.
Tip: Do not paint the entrance reducer, it will no longer fit in the entrance space. It’s going to require some sanding, and I’ll probably order the metal mouse guard I was going to get from the get-go. Need to do some more reading first.
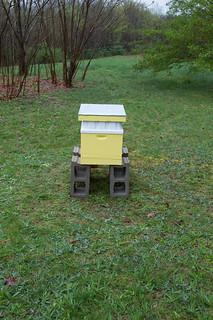 |
| The back of the hive faces northwest, so you are looking southeast here. |
My next post will describe installing the bees into the hive!
Materials:
- 4 cinder blocks.
- 1 hive stand board.
- 1 bottom board.
- 1 entrance reducer.
- 1 full-size super.
- 10 frames with wax foundation.
- 1 top board.
- 1 feeder.
- 2 bent hive nails.
- 1 lashing strap with ratchet.
- 5 lbs. Best Yet granulated sugar.
- I decided not to try any medication this first time.
- 1 bottle of isopropyl alcohol.
- Hive tool.
- Pocket knife.
- Awl.
- Lashing strap.
- Pliers.
No comments:
Post a Comment